Sew What’s Up Presents
The Sew What’s New Archive
This archived content is from Mary Wilkins’ sewing and
quilting message board “Sew What’s New,” which was
retired in August 2007. It is being provided by
“Sew What’s Up,”
which serves as the new home for many members of “Sew What’s New.”
From: dcloud
Date: 03-30-2007, 01:14 AM (1 of 43)
|
Today I finally got down to the business of sewing ... err, practicing, that is. I had no idea sewing a stitch could be this addictive. I cut out some fabric squares to practice on and sewed my first straight stitch. It was a bit wobbly (the straight stitch) and I don't know if that's me or the machine. It's probably me. When I'm sewing it seems that the fabric is too loose below the foot, because it appears to shift or "bounce" when I'm sewing. It's probably why the straight stitch is not so "straight". I used a dark thread in the bobbin and a white thread on top so I could examine the stitches once I was done and I paid close attention to the stitch and the examples in my manual to see if it was sewing correctly. It appears to be doing a good job, as far as I can tell. The zig-zag and rick rack stitches are pretty cool. I realize it's going to take some practice keeping the fabric straight under the needle while sewing and using the foot pedal. So far I'm having a blast and I'm looking forward to actually sewing something. 
|
User: dcloud
Member since: 03-21-2007 Total posts: 72 |
From: Sancin
Date: 03-30-2007, 01:45 AM (2 of 43)
|
How exciting for you!! Try sewing on some lined paper to see if you can sew the seams straight. Another thing is to take a piece of mounting tape (foam tape with paper on each side). Put it sticky side down the width you want the seam to be and keep the fabric against the edge as you sew. Or use a stack of post its. You can experiment with how wide you want the seams to be this way as well. Can also keep one hand on fabric behind foot (don't pull, just stabilize) as you use the other hand to guide the fabric through. Re loose under foot. I can't recall you saying what kind of machine you have, but read the instruction manual. Some machines have a dial to increase the presser foot pressure. Have fun! Keep it up! 
*~*~*~* Nancy*~*~*~* " I try to take one day at a time - but sometimes several days attack me at once."
|
User: Sancin
Member since: 02-13-2005 Total posts: 895 
|
From: dcloud
Date: 03-30-2007, 03:36 AM (3 of 43)
|
Thanks. I got a question. As I'm reading about sewing I keep coming across the same thing over and over; use a new needle for every other garment. Is this true? If it is then should I stock up on some needles? I know needles are pretty cheap, but from what I'm reading it appears you need to use a new needle almost every time you sew. I figure I'll need needles anyway so I got some from the Singer site - ten style 2020 (sizes 11 14 & 16), ten style 2045 (sizes 11 14 & 16), and some sewing machine oil while I was at it. |
User: dcloud
Member since: 03-21-2007 Total posts: 72 |
From: DorothyL
Date: 03-30-2007, 06:58 AM (4 of 43)
|
I clean and oil the machine and change needles with every project. It helps a lot. So does the right size needle. I use 80 (12) for average weight fabric. I like Universal for most things (Pam doesn't and she knows a lot more than I do), ball point for stretch and Microtex when I need a very sharp needle. Dorothy |
User: DorothyL
Member since: 12-09-2002 Total posts: 3883 |
From: MaryW
Date: 03-30-2007, 07:47 AM (5 of 43)
|
My manual says to clean your machine every 8 hrs. or so. My machine makes a distinctive thud noise when I need a new needle but unless I am sewing the same type of fabric time after time I change with each project.
MaryW
owner/editor of Sew Whats New |
User: MaryW
Member since: 06-23-2005 Total posts: 2542 
|
From: Sancin
Date: 03-30-2007, 05:53 PM (6 of 43)
I don't change every time I sew or even every project. I sort of intuitively know when to change. It kind of depends upon the fabric, size of project and length of time you are sewing. If I am sewing on denim, even shortening jeans, I would change the needle more than if I were sewing pillow cases with light fabric. If I were making a complicated dress or suit I that was taking me hours to sew and had a lot of seams I would probably use one needle for the whole project, unless I broke one in process.  I also change needles when the sound changes, as Mary suggests, which I must admit, doesn't seem to be all that often unless in marathon sessions. I tend to dust/clean my machine more often than changing the needle. Personally I don't think needles are inexpensive, considering the number I go through. I also find some machine needles better than others. I like Schmetz as I have a Janome and an Elna. I also use the Schmetz on my Singer Featherweight. I made a little fabric booklet and labelled pages with the types of needles and store my used needles there until needed again. I check them carefully for burrs before I store them and again when I reuse them. If you are learning you should probably use different needles just to see how they look and the seams. Get yourself a permanent pen and make notes on your practice sheets. 
*~*~*~* Nancy*~*~*~* " I try to take one day at a time - but sometimes several days attack me at once."
|
User: Sancin
Member since: 02-13-2005 Total posts: 895
|
From: lendube
Date: 03-30-2007, 06:04 PM (7 of 43)
|
No hard and fast rule for me either. I'm with Nancy. Lennie |
User: lendube
Member since: 08-06-2006 Total posts: 1548 |
From: PaulineG
Date: 03-30-2007, 06:07 PM (8 of 43)
|
http://swn-archive.sew-whats-up.com/t-20916.html&highlight=needle Have a look at this thread (click on the link) - many different viewpoints and tips. I'm sort of like Nancy though - obviously some projects are more ruinous to your needles than others - so it depends on what I've been doing. I will say though that if I wait a bit too long to change I sometimes regret it. If you're sewing something fairly tough or in a place it won't be seen - maybe wait till you think you need to (I also hear a sound change) - if it's delicate or expensive fabric - err on the side of caution and change more often. Good luck with your projects. Pauline
|
User: PaulineG
Member since: 09-08-2006 Total posts: 901 |
From: dcloud
Date: 03-30-2007, 08:37 PM (9 of 43)
| Great tips everyone. Thanks. I think I have enough for the moment (needles and thread). Basically I bought the machine to shorten pants, fix torn clothing, cuffs, and a couple personal projects. I may end up getting a blindstitch hem foot for my machine since I'm seeing a lot of uses for it in my books. |
User: dcloud
Member since: 03-21-2007 Total posts: 72 |
From: HeyJudee
Date: 03-30-2007, 10:53 PM (10 of 43)
|
Just a thought...when you are practicing, are you using two layers of fabric when you are sewing. I know that when I first started many years ago, I would try sewing on one piece of material (not folded over) and try to set the tension. But you should always use two pieces (or one piece folded when checking your tension. Also, the tension may need to be changed when sewing on different types of fabric. Good luck.
TTFN from
Judy |
User: HeyJudee
Member since: 01-25-2005 Total posts: 1366 
|
From: dcloud
Date: 03-30-2007, 11:14 PM (11 of 43)
|
Judy! Thank you. I was just sewing across the fabric (not folded) with that straight stitch. With the decorative ones I folded it over and those stitches came out better. Duh. I'm also looking at getting at least one DVD where I can see someone doing these seams and stitches, because I can't get my head around most of these terms in my books - seam allowance, hem allowance, etc. Seeing someone do it will probably help. |
User: dcloud
Member since: 03-21-2007 Total posts: 72 |
From: MotherInLaw
Date: 03-31-2007, 12:51 AM (12 of 43)
|
If you watch where the fabric is going through the presser foot instead of the needle you can sew straighter. I find if I watch the needle I tend to get off my mark. If you put the needle of the machine down in the fabric and look to see where the edge of your fabric is on the right of the presser foot then you can guide it that way instead of looking at the needle. There should be marks on the machine bed marking ½, ¼ ect ect. If you keep your fabric lined up with those lines it helps to keep straight. You can even mark from your needle out taking a ruler and measuring what seam allowance you want then marking the bed of the machine at that point with some tape. A seam allowance is the area of fabric that is between your stitching line and the edge of your fabric.
I'm regressing back into my youth, I just have to figure out how I'm going to convience my body to come along with me.
|
User: MotherInLaw
Member since: 06-25-2005 Total posts: 1118 
|
From: dcloud
Date: 03-31-2007, 01:40 AM (13 of 43)
| Yep, I just read about that. Thank you. I also found this nifty little magnetic seam guide on Nancy's Notions. |
User: dcloud
Member since: 03-21-2007 Total posts: 72 |
From: PaulineG
Date: 03-31-2007, 02:09 PM (14 of 43)
|
I have one of those and it's okay but it does move a little bit so it's not foolproof.
Pauline
|
User: PaulineG
Member since: 09-08-2006 Total posts: 901 |
From: Sancin
Date: 03-31-2007, 03:20 PM (15 of 43)
I have one of the magnetic guides and it is a waste of money. Also I tend to be careful with magnets around sewing machines, particularly if there are any computer components. A small stack of 'post-it notes' are exactly the same size as the magnetic guide and don't shift. 
*~*~*~* Nancy*~*~*~* " I try to take one day at a time - but sometimes several days attack me at once."
|
User: Sancin
Member since: 02-13-2005 Total posts: 895
|
From: DorothyL
Date: 03-31-2007, 03:38 PM (16 of 43)
|
As I procrastinated today, I read this in Threads magazine -- Here is an easy way to create and effective seam guide using multiple layers of masking tape.... Slightly flatten a roll of masking tape and use a rotary cutter or craft knife to carefully score across the tape in two place an inch apart to the depth of three or four layers of tape. Peel off all the layers as one unit and affix the tape stack to your machine at the appropriate seam allowance. It was a readers tip whose name I'm not going to use because she might not want it on the Internet. Seems like a good idea. Dorothy |
User: DorothyL
Member since: 12-09-2002 Total posts: 3883 |
From: dcloud
Date: 03-31-2007, 05:27 PM (17 of 43)
|
Thanks for the tip, D. I just found this same tip in one of my books today. That sounds like a better idea, and it won't cost me anything. Also, I finally tried doing some straight stitches on a folded seam and they look great. I'm learning that sewing speed (pressing the foot pedal) is important as well as carefully guiding the fabric under the needle. The machine naturally pulls itself along, but controlling that speed and also stopping/reversing requires some skill. I have a whole new respect for anyone who can sew a garment together. |
User: dcloud
Member since: 03-21-2007 Total posts: 72 |
From: lendube
Date: 03-31-2007, 09:03 PM (18 of 43)
|
Painter's tape (the blue stuff) works great too with no residue. I use it on the quilt rulers as well. It's easier to see than the khaki colored masking tape. Lennie
|
User: lendube
Member since: 08-06-2006 Total posts: 1548 |
From: bridesmom
Date: 04-03-2007, 01:09 AM (19 of 43)
|
I used some red electric tape when I needed a good seam guide. It'll come together for you, with practice. My husband started sewing last winter, his first seams were hilarious, he was all over the place, but after a few days, he got pretty good.
Laura
Tickled pink with my Innovis 4000D |
User: bridesmom
Member since: 01-21-2004 Total posts: 2026 |
From: Brenisback
Date: 04-03-2007, 05:10 AM (20 of 43)
|
Posted Notes! good one
Brenda
People come into your life ...for a Reason a Season or a Lifetime. |
User: Brenisback
Member since: 09-20-2004 Total posts: 228 |
From: dcloud
Date: 04-05-2007, 03:56 AM (21 of 43)
|
Yesterday I bought my first pattern - a Simplicity one for making T-shirts. Just a simple project and I also got a good deal on some fabric ($1 a yard). It's bright red and kind of gaudy, but it's just for practice. It was odd going to the fabric store and rummaging through the pattern books. I was surrounded by women and I felt really out of place. So now I have to cut this stuff up and piece it all together. It probably won't seem as daunting a task once I get used to how to do all this - pre-wash, cutting, sizing, ironing, hem allowances, etc. My brother and my niece have ferrets and they suggested I make them a hammock - it's what the ferrets sleep in. It sounds like a likely project, and possibly easier for me at the moment than making clothing. |
User: dcloud
Member since: 03-21-2007 Total posts: 72 |
From: PaulineG
Date: 04-05-2007, 06:05 AM (22 of 43)
|
Yesterday I bought my first pattern - a Simplicity one for making T-shirts. Just a simple project and I also got a good deal on some fabric ($1 a yard). It's bright red and kind of gaudy, but it's just for practice. It was odd going to the fabric store and rummaging through the pattern books. I was surrounded by women and I felt really out of place. I love working with knits - I guess partly because they usually don't need zips and buttonholes and also don't need some of the construction details like darts that a woven fabric might. Most of my early projects were of knit fabric of some type and I seem to have a low failure rate with them which is good for the ego. It is possible though that for $1 a yard the fabric you got might not hold it's shape terribly well. Or it might be that the colour is the reason is was on sale. I'm in Australia and we very rarely get knits at a price like that - when they are on sale they're usually of the sort that stretchs very easily and don't go back to their original size. Hopefully that is not the case for you but do keep in mind that if it looks a bit saggy or shapeless it might be the fabric. As to the colour - you can wear a tshirt as a pj top or under a shirt just for warmth - and you still get to wear something you made for yourself - a feeling that is really hard to beat. Have lots of fun with it, ask for help if need be and we always love a photo of finished projects (hint, hint). BTW - don't feel out of place in the fabric shop - the best person to ask for sewing advice in my local fabric shop is a man - the women there don't seem to know much about sewing at all. They're okay on product knowledge but that's about all. Of course that was before I joined this forum. 
Pauline
|
User: PaulineG
Member since: 09-08-2006 Total posts: 901 |
From: dcloud
Date: 04-06-2007, 12:24 AM (23 of 43)
|
I decided to try making the ferret hammock first since that seemed a lot easier than a t-shirt. Well, it wasn't. I wasn't aware how difficult it would be just to try an sew a straight line. I think it may be the fabric, too. This stuff the woman sold me at the store is quite stretchy. Plus I'm not too good at sewing with pins in the fabric. Also, I definitely need a good iron so I can iron the seams/stitches. The cordless Oreck iron I have is pretty useless. I see now the most difficult part of this whole operation is going to be the many different things I must know - what type of fabric? what needle and thread for the fabric? what stitch and stitch setting for the fabric? what setting should the iron be on? All in all I managed to make a cool looking red rectangle, lol. I forgot to sew the loops into the corners when I sewed the hammock together. I see I may need to find something that can poke the corners out when I turn the sewed fabric right side out. My corners looked horrible. I think you have to snip them or something. Anyway, I'm not giving up. I'm going to have to give this another shot. I did learn how to clean out the machine, and I was thankful I ordered that Singer machine oil because I needed to add a couple drops inside the bobbin mechanism before I put it all back together. It wasn't hard to take apart and reassemble, either. I suppose over time it's just something you get used to. |
User: dcloud
Member since: 03-21-2007 Total posts: 72 |
From: grandma C
Date: 04-06-2007, 01:08 AM (24 of 43)
|
A good sewing book that give you some lessons to step you through the basic how to' s of sewing would be a great place to start. Maybe one of the seasoned seamstresses here will give you a name. Practicing on the scraps from your sewing project will help with the straight stitching part. use your machine manuel for instructions and try sampling the different stitches and the different stitch lengths. That is a good place to start. It is like learning to type. You do a lot of useless exercises to become proficient at typing. Make a simple dishcloth first. then make a pillow . Hem some squares of fabric and use for napkins oor placemats. Start simple to develope your skills and confidence. As for the ferrett Hammock. Maybe you could sew the loops on the outside of the corners instead of enclosing them in the seam or split the seam a little and insert them and then sew in place. Grandma C |
User: grandma C
Member since: 01-15-2007 Total posts: 263 |
From: PaulineG
Date: 04-06-2007, 01:18 AM (25 of 43)
|
Plus I'm not too good at sewing with pins in the fabric. I see now the most difficult part of this whole operation is going to be the many different things I must know - what type of fabric? what needle and thread for the fabric? what stitch and stitch setting for the fabric? what setting should the iron be on? Nobody should be good at sewing with pins in fabric. That is to say the pins have to come out before they get too close to the s/m needle. Is that what you mean? I know some of the people on this site leave them in but it's not a very good idea. It's a really good way to break your s/m needle or even have one fly up. I'm pretty sure I've heard/read that somebody here has done that. When I sew I insert the pins so that on the left hand side of the fabric the point is facing away from me and the head is towards me and the length runs vertically. Then as you get close you can just catch the head and pull it out. You should always try and sew so that the bulk of your fabric sits on the right hand side of the needle so if it's something bulky it doesn't get scrunched up or move around. If you press something fairly basic like a square or rectangle you may even get away with not using pins at all but stretch fabrics tend not to hold a press quite as well. When you sew with stretch you should just gently guide it through, not pulling from behind or holding it back at the front. As for needles - for stretch it should be marked as a stretch or ball point needle. With wovens you use a needle that is sharp and pierces the fabric, with stretch a needle that is blunter and pushes the fabric threads to the side and slides between them. The higher the number on the needle the smaller it is - so you use higher numbers on finer fabric (sheer) and lower numbers on heavier (denim). I think tshirt stretch is sort of in the middle so an 80 or 90 first number is about right. Have a look in your manual to see if your machine has stretch stitches. It should if it is relatively new. An older machine you just use a fairly narrow length zigzag. If you're still uncertain somebody here will know the right stitch on your machine. The iron - well I have a bad habit of ironing at as high a temperature as I possibly can without burning. Occasionally I get caught out by pushing it just a little bit too high with synthetic/mixed fabrics. It should be easy to get that bit right but I think the cordless iron might be a problem. Don't they lose heat very quickly? Pauline
|
User: PaulineG
Member since: 09-08-2006 Total posts: 901 |
From: dcloud
Date: 04-06-2007, 03:06 AM (26 of 43)
|
Grandma, thank you for those suggestions. I'm going to try making some of those things with the bizarr-o red fabric I got. As for the hammock for the ferrets I'm going to try making that again. I need to get a better iron on payday, because as the books mentions quite a bit almost everything needs to be ironed - or pressed - which is something else I need to practice on. I do have two books - Sewing for Dummies and Simplicity's Simply the Best Sewing Book. These are really good books with lots of great tips and instructions. Nobody should be good at sewing with pins in fabric. That is to say the pins have to come out before they get too close to the s/m needle. Is that what you mean? I know some of the people on this site leave them in but it's not a very good idea. Yes, that's what I meant. And I agree - it's not a good idea. I didn't hurt my machine or the needle or even myself, but I discovered that this can be a very tricky process. I did end up sewing as you described, with the pin heads toward me, and I pulled them out as I went. This red stuff is fairly elastic and I think that's why it was so difficult to sew. When you sew with stretch you should just gently guide it through, not pulling from behind or holding it back at the front. As for needles - for stretch it should be marked as a stretch or ball point needle. With wovens you use a needle that is sharp and pierces the fabric, with stretch a needle that is blunter and pushes the fabric threads to the side and slides between them. The higher the number on the needle the smaller it is - so you use higher numbers on finer fabric (sheer) and lower numbers on heavier (denim). I think tshirt stretch is sort of in the middle so an 80 or 90 first number is about right. Thanks for the tips. I think this may be another problem I had, because I didn't change the needle for this fabric. I left the needle in there that came with the machine and I believe that's a standard sharp needle (not sure of the size). The lady at the fabric store claimed this is a woven fabric - a knit, she called it. But it sure has a lot of stretch to it. Perhaps I should use a ballpoint needle? Have a look in your manual to see if your machine has stretch stitches. It should if it is relatively new. An older machine you just use a fairly narrow length zigzag. If you're still uncertain somebody here will know the right stitch on your machine. I have a Singer Simple model 3116. It has a lot of stitches which I can choose by turning a dial on the back of the machine. The stretch stitches I think are mostly zig-zag stitches. The iron - well I have a bad habit of ironing at as high a temperature as I possibly can without burning. Occasionally I get caught out by pushing it just a little bit too high with synthetic/mixed fabrics. It should be easy to get that bit right but I think the cordless iron might be a problem. Don't they lose heat very quickly? I found an iron that everyone here seems fond of - a Conair DPP3000 (http://www.target.com/gp/detail.html/601-2354686-1988955?asin=B000GTRG66&AFID=Shopping&LNM=B000GTRG66|Conair_Iron__DPP3000&ref=tgt_adv_XSC10001) which I found at Target for $40. Yes, the cordless is pretty useless for sewing purposes. I have to keep sitting it back on the base to reheat. Pauline, Grandma, and everyone who has replied to my threads, I appreciate all of your suggestions and your words of encouragement. Thank you. |
User: dcloud
Member since: 03-21-2007 Total posts: 72 |
From: PaulineG
Date: 04-06-2007, 08:29 AM (27 of 43)
|
The lady at the fabric store claimed this is a woven fabric - a knit, she called it. But it sure has a lot of stretch to it. Perhaps I should use a ballpoint needle? A woven fabric is a fabric with threads that run horizontally and vertically. Think hessian which is a woven but obviously fairly coarse. In theory if you pull a thread from a woven (as long as it's loose enough weave) parallel to the finished edge of the fabric (called the selvage) you will get an absolutely straight line with a thread missing. Woven fabrics will often but not always fray on an unfinished edge. You can get wovens with some stretch in them because a certain proportion of the thread is made of elastic. Cotton, linen and flannel are examples of woven. There's also heaps of synthetic mixes. A knit is not made in the same way - I'm not entirely sure of the process. Knits have varying degrees of stretch from a little to a lot. They tend not to fray much (if at all) on an unfinished edge. Tshirt fabric, windcheater (not sure if you call it that in US) fabric and polar fleece are examples of knits. Heaps more of those too. I really like Sewing for Dummies but only borrowed it from my local library. What I did think it was missing was a good reference section. Does the Simplicity book have one of those? Pauline
|
User: PaulineG
Member since: 09-08-2006 Total posts: 901 |
From: lendube
Date: 04-06-2007, 12:04 PM (28 of 43)
|
Hey dcloud, I made a ferret hammock for my son's ferret, Harvey, for Xmas. I'm going to be immodest and say it turned out great. I think I have a picture. I'll look for it and if I can't find it I post how I made it later. May I suggest that you move/continue this as a separate post instead of hiding here under "And I'm Off" where you won't get the viewers that you would otherwise? Might as well get as much input as possible!  Lennie |
User: lendube
Member since: 08-06-2006 Total posts: 1548 |
From: dcloud
Date: 04-06-2007, 08:56 PM (29 of 43)
|
Pauline, the Simplicity book doesn't have a reference section. Also, a lot of the things they talk about refer to sewing on a serger, but they do include regular sewing machines. Also, the red fabric I have I'm not sure what it is, but she claimed it is a knit (I think). It has a lot of stretch, almost like Lycra. I also have to figure out how to pre-wash it, which is something I did not do before I started sewing. Lennie, thanks. For the hammock I found this tutorial here (http://www.neferrets.org/hammock.htm). It seems pretty straightforward. It would be nice to get more responses, because all of them have been extremely helpful. Where should I move this thread? |
User: dcloud
Member since: 03-21-2007 Total posts: 72 |
From: lendube
Date: 04-06-2007, 10:48 PM (30 of 43)
|
Hi again dcloud, Happy to help. I looked at the tutorial and it's very much like the hammock I came up with which regrettably I either didn't take/save a picture of. I made the hammock out of camo fleece and instead of loops I made straps out of webbing. (Webbing is like any strap that you'll find on a tote bag or backpack. It comes in nylon or cotton.) At the end of the straps I attached a plastic clip that I also got at the fabric store (JoAnn's). Now I made the 4 straps about 10" long so the hammock would hang down further. I also added a pocket (single piece of fabric with a finished edge) on top of the hammock for the ferret to crawl into. I just sewed three layers together instead of the two, get it? Be happy to help more if you need it. I spoke to my son this evening and his ferret uses the hammock ALL the time. He was in it as we were speaking. (Harvey, not my son. lol) Look at the top of this page. It says, "Sew What's New Archive" then "Beginner Sewing". Click on "Beginner Sewing" and then click on "New Thread" and write your post. It will appear as a new thread. Most users here (I'm assuming) come to the site and click on "New Posts" to get whatever new threads have appeared since last they came to the site. They'll see it this way. Good luck and I'll watch for your new post. Lennie
|
User: lendube
Member since: 08-06-2006 Total posts: 1548 |
From: dcloud
Date: 04-07-2007, 12:14 AM (31 of 43)
| Lennie, thanks for those tips. I may have to get some different material to make this hammock. I didn't understand where you said to post this. This thread is already in the Beginner section. I clicked on new thread to start this one. That's the same thing, isn't it? Or are you suggesting starting a second thread? |
User: dcloud
Member since: 03-21-2007 Total posts: 72 |
From: PaulineG
Date: 04-07-2007, 01:20 AM (32 of 43)
|
Lennie I actually click on Quick Links and then on Today's Posts. This is mainly because my computer is used by many people in the family and I often get booted off before I get around to making any replies. This only works of course if you have no life and hop on the boards here more than once in every day. Otherwise you're better off with New Posts.
Pauline
|
User: PaulineG
Member since: 09-08-2006 Total posts: 901 |
From: lendube
Date: 04-07-2007, 01:51 PM (33 of 43)
|
My mistake, dcloud. I didn't realize (for whatever reason ) that you had started this post. But yes, I it came down to me thinking that a second posting would be a good idea since this one has taken so many turns and diversions. I'm going to see if my son can take a pic of the hammock and send it to me to post here. I'd like you to see what mine looks like. I think you'd like it. Lennie ~ Sorry about the confusion. |
User: lendube
Member since: 08-06-2006 Total posts: 1548 |
From: lendube
Date: 04-07-2007, 01:56 PM (34 of 43)
|
Pauline, I go to Today's Posts too when I can't get through the New Posts in one sitting. I'm the only one that uses this laptop except maybe once a month when Kevin needs to be online at home. He does most of that at work. I hate when he gets on 'cause he just can't stand the way I've set some things up/this and that take too long, etc. and he gets a little bit grouchy.  He can be a bit impatient at times. He can be a bit impatient at times. Lennie
|
User: lendube
Member since: 08-06-2006 Total posts: 1548 |
From: lendube
Date: 04-07-2007, 05:02 PM (35 of 43)
|
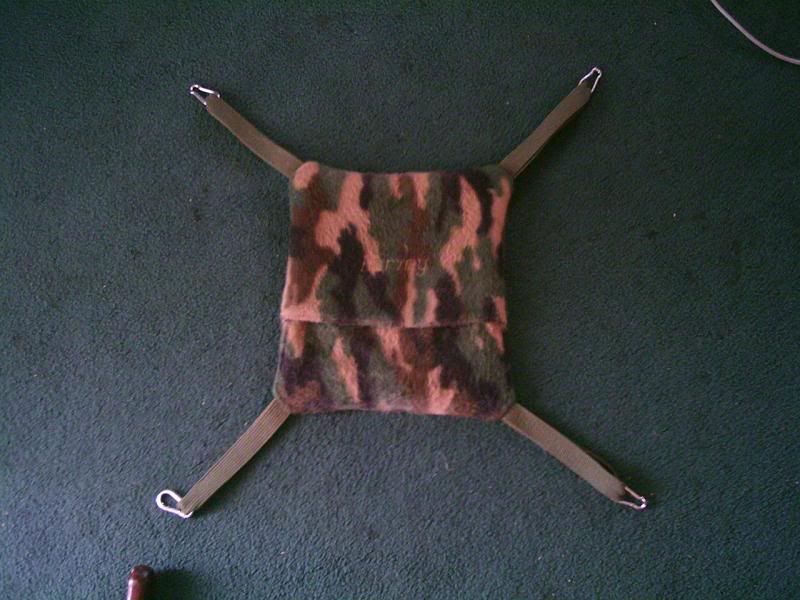
http://i164.photobucket.com/albums/u20/lendube/PHTO0001.jpg Here's a shot of the hammock. I called my son and asked if he could take a pic. He said his camera is lousy but it's still not too bad a shot. I embroidered Harvey's name on it but you can barely see it. It's a little worse for wear since it's been washed several times and used constantly. Your friend's ferret should love it and they really don't care what it looks like. (You do realize this is all hush-hush since ferrets are illegal to own in Calif.????  :bg :bgLennie
|
User: lendube
Member since: 08-06-2006 Total posts: 1548 |
From: dcloud
Date: 04-07-2007, 08:25 PM (36 of 43)
|
Lennie, that looks great. I finished my attempt at a hammock this evening and, well ... let's just say it's another red rectangle only this time with loops, lol. This fabric is way too stretchy for me to work with and trying to sew in the loops in the corner was a task because after they were folded and inserted into the corners the fabric was pretty thick and hard to sew over. The machine wasn't pulling the fabric along so I had to gently pull it along by hand. Not sure if this is what you're suppose to do or not. This resulted in the stitches being unevenly spaced. Also, when I was done sewing, I just cut the excess threads off. The books say to tie off the threads, but I couldn't figure out how to do that. Another thing, whenever I stopped sewing and turned the knob to raise the needle sometimes it would not raise. It was stuck or something. I had to fool around with it before I could get it out of the fabric. Not sure what caused that. Anyway, I finished it, and while I'm not very satisfied with it at least it's done. Hopefully the next project is more fun than a chore. |
User: dcloud
Member since: 03-21-2007 Total posts: 72 |
From: PaulineG
Date: 04-07-2007, 09:18 PM (37 of 43)
|
When I tie off threads I usually leave a fair bit of excess thread and either tie the two together (works for the edge of fabric or thread a hand needle and take the front thread through to the back and tie them together like a double knot in a pair of shoes. Depending on what you're making when you get to the end if you just put it into reverse for a few stitches and backstitch a little it might be okay. Depends on how much strain the seam will be under. I'm sure there's a few easier ways though - this is definitely worth a thread in Beginner Sewing. Pauline
|
User: PaulineG
Member since: 09-08-2006 Total posts: 901 |
From: dcloud
Date: 04-07-2007, 09:23 PM (38 of 43)
|
Hey, that's a great idea. I never thought of doing that. I don't have any hand needles here, but my mom has plenty. I did backstitch on most of the ends, and I ran a zig-zag stitch on all four sides to secure it more since two ferrets will be hanging in it (and one of them is a little overweight). Thanks, Pauline
|
User: dcloud
Member since: 03-21-2007 Total posts: 72 |
From: dcloud
Date: 04-25-2007, 03:52 PM (39 of 43)
|
I have done quite a few mending jobs now - pillow cases, curtains, even a pair of jeans. This is mainly why I bought the machine; to repair stuff. I realize now that anything more will require a lot more patience and time. The constant having to look up what type of needle goes with what fabric, what size needle, what stitch, stitch settings ... ugh. I am satisfied that the machine will be able to handle repairing items and that is something I myself can handle. As for the rest maybe someday when I'm bored and have the gumption to constantly look up all these things. Thanks for all your help
|
User: dcloud
Member since: 03-21-2007 Total posts: 72 |
From: PaulineG
Date: 04-25-2007, 06:02 PM (40 of 43)
|
That post had the distinctive flavour of a goodbye. Hope not. Remember when you learnt to drive a car - the number of things to learn and remember was overwhelming. But now it's second nature. You barely need to think about what you're doing at all (you can tell with some drivers). Sewing is heaps easier and safer than driving and the learning curve not quite so long. If you're feeling discouraged why not try a class or some one on one lessons. You can get online sewing lessons but a lot of people find that seeing and doing is a lot more effective than reading about. Au revoir. Pauline
|
User: PaulineG
Member since: 09-08-2006 Total posts: 901 |
From: lendube
Date: 04-25-2007, 06:28 PM (41 of 43)
|
Look, dcloud has his own personal cheerleader! I agree. It's just like any other skill. Just do it and you'll learn something new each time. Lennie |
User: lendube
Member since: 08-06-2006 Total posts: 1548 |
From: dcloud
Date: 04-27-2007, 08:42 PM (42 of 43)
|
It's not a goodbye. It's just that I've found that trying to figure out needle/thread/fabric/settings can be really tedious. I've thought about putting some of this info on cards and keeping them in a drawer so I can just look at them to see what I need. I do have a couple patterns that I would like to try, but I'm going to need better fabric than what the woman gave me at the sewing store. That red stretch stuff is pretty useless for making t-shirts and such. I don't get out much so anything I need to do I use the computer for. |
User: dcloud
Member since: 03-21-2007 Total posts: 72 |
From: JustSewCrafty
Date: 05-02-2007, 04:53 PM (43 of 43)
|
If your sewing machine is computerized, make sure you dont use the magnetic one -use tape or postits instead.
May your bobbin always be full-
Stephanie www.chasingthreads.blogspot.com "Sewing is the new black" |
User: JustSewCrafty
Member since: 10-04-2006 Total posts: 168 |
Visit Sew What’s Up for the latest sewing and quilting tips and discussions.
This page was originally located on Sew What’s New (www.sew-whats-new.com) at http://www.sew-whats-new.com/vb/archive/index.php/t-21942.html
Sew What’s Up is hosted by ZenSoft