Sew What’s Up Presents
The Sew What’s New Archive
This archived content is from Mary Wilkins’ sewing and
quilting message board “Sew What’s New,” which was
retired in August 2007. It is being provided by
“Sew What’s Up,”
which serves as the new home for many members of “Sew What’s New.”
From: blackie
Date: 06-27-2007, 08:41 PM (1 of 4)
 Surely, even if you have never performed this sewing operation before you get my corny pun. Most of us who sew also have to at least admit to ourselves that we should mend, as well. What better way to keep my six-month commitment (in my case, for four people) then to learn how to repair well-loved clothes with a catastrophic tear. Keep in mind this is my *first* experience darning. I am not an expert. However I could not Google much information about machine-darning so I thought I'd to a mini-tutorial. My original post regarding a darning foot (http://sew-whats-new.com/vb/showthread.php?p=192626) also has a few good tips. A word about patches. Most novice stitchers have put on a patch like this: 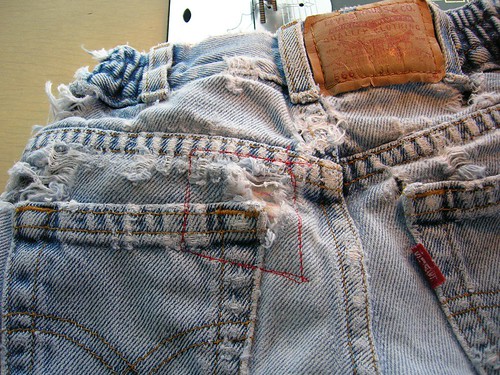 A typical patch. (Check out how frayed these jeans are! A good pair of Levi's can withstand a lot of play and be worthwhile to keep wearing for a long time). With regards to the patch, we are looking at a piece of fabric applied with a perimeter stitch. If you put the patch on the front of the pants, you can provide a bit of color or interest. The problem is, this sort of patch, especially if applied to an area of stress (as patches often are), will wear out fast as the breach of the weave will slowly (or quickly) work its way to your stitches. A zig-zag or several rows of stitches may forestall tearing but the patch isn't built to last. Which leaves me to the process of darning. With machine darning you are generally doing the following: 1. Setting your machine to straight stitch. 2. Lowering the feed dogs (the little teeth underneath the foot that scootch the fabric along). 3. Applying a darning foot - a specialty foot with a circular base and (usually) a side-spring or arm. 4. Securing the tear (with hoop or hands) and guiding the work in a series of parallel stitches, effectively weaving over the tear (either with or without a patch applied). Lowering the feed dogs is on most newer machines a quick flick of a plastic switch. Not so on my 1950 Singer, although it's almost as easy. Setting the machine back on its hinges, loosening a thumbscrew, and toggling a cast-iron tab to a different setting (you can see the two screwhole settings roughly in the center of this photograph): 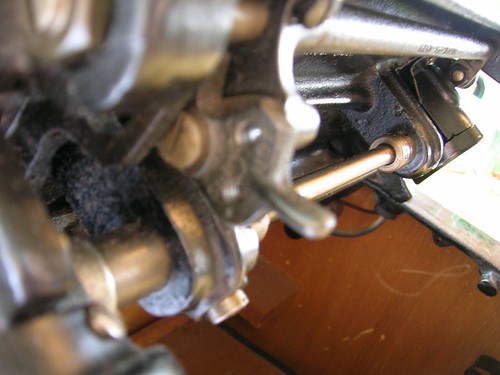 Darning is kind of odd and terrifying at first. For those who have never sewn without feed dogs lowered, it takes some time to get used to using your hands to move the work along. There is some danger of sewing your finger as you gain experience. Not to mention the darning foot (if it has a spring or arm attached) is meant to release pressure at the needle upstroke; this provides more free range of motion but is also a bit alarming. As with many new sewing techniques: go slow ! The finished work is posted above; here is the back of the work: 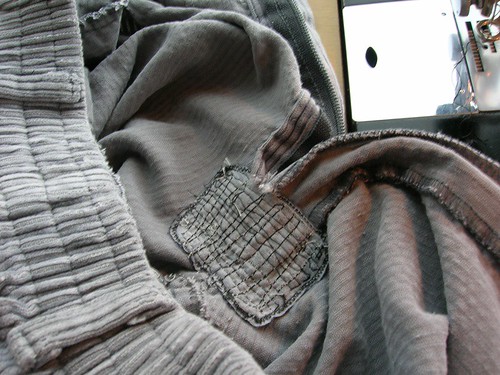 Crotch-side of the patch. Not pretty, eh? Note: this was only my second darned patch and in a difficult-to-darn area; technique will surely improve. The important thing is it's sturdy. The rest of the pants will fall apart before this crotch does. At this point, you could apply a pretty patch to the public side of the garment if you like: I didn't bother since this was at the crotch of my 3-year old's pants and not a highly visible area. Darning work usually requires the use of a hoop to really stretch out the area needing work. It is hard to control the straightness and evenness of the stitches when you are also using your hands to hold the work flat. I don't have a hoop but I would have had difficulty getting one small enough that would hold the bulky fly flat. However, after this exercise - which really did take a torn pair of pants and render them wearable again - I plan to keep on the lookout for darning hoops and technique! see the mundane life of a housewife.
|
User: blackie
Member since: 03-31-2004 Total posts: 594 |
From: LegalDealer
Date: 06-27-2007, 09:40 PM (2 of 4)
|
My husband loves his old work jeans so much, that he asks me to patch them up all the time. He tries the guilt trip too : "oh you spend so much time sewing for yourself, doing your own projects --you can't find time to do something for me, fix the pants I love..." So, I grudgingly do it, well this last time I did 2 out of 3 of pairs. Yet, I don't go thru the trouble of hooping and darning, my hubby gets a scrap piece of another pair of jeans long gone, with a satin stitch around it. THOSE are holding up, but other holes seem to appear throughout the garment! More guilt coming... But come on! Must he wear rags!? (literally!) |
User: LegalDealer
Member since: 10-19-2006 Total posts: 27 |
From: MartySews2
Date: 06-28-2007, 02:41 PM (3 of 4)
|
Nice tutorial Blackie. Thanks for sharing. Marty 
|
User: MartySews2
Member since: 05-03-2007 Total posts: 293 |
From: blackie
Date: 06-28-2007, 04:28 PM (4 of 4)
|
Yet, I don't go thru the trouble of hooping and darning, my hubby gets a scrap piece of another pair of jeans long gone, with a satin stitch around it. I have done exactly that kind of patch, and it did hold up. I think it has a lot to do with the looseness of the weave, for one. Whatever works, eh? And you're welcome, Marty! see the mundane life of a housewife.
|
User: blackie
Member since: 03-31-2004 Total posts: 594 |
Visit Sew What’s Up for the latest sewing and quilting tips and discussions.
This page was originally located on Sew What’s New (www.sew-whats-new.com) at http://www.sew-whats-new.com/vb/archive/index.php/t-22740.html
Sew What’s Up is hosted by ZenSoft